

Candle Range Theory (CRT) Strategy
 Created 16 Mar 2025
·
Updated 05 Sep 2025
Created 16 Mar 2025
·
Updated 05 Sep 2025
The Candle Range Theory (CRT) Strategy is a Premium mechanical strategy for the NinjaTrader 8 platform. The strategy can be used to pass propfirm evaluation challenges.
Prerequisites
To properly use this strategy you should have the following prerequisites available.
- NinjaTrader 8, with any license type. Click here to download
- An automated-trading.ch account with an active Premium Subscription
Important Disclaimer
We strongly recommend that you never run your algorithmic trading systems on your hard-earned real money. You should always minimize your risk and run your strategies on trader funding programs, so the maximum amount you risk losing is the monthly subscription fee you pay those programs.
Entry Setup Examples
This strategy has a single entry setup, based on the Candle Range Theory (CRT) methodology.
In short, the CRT entry model is a high-probability entry model with a defined risk/reward ratio. It's based on analyzing a candle pattern on a higher timeframe and looking for entry confirmation on a lower timeframe.
On the higher timeframe, we look to identify a CRT candlestick pattern — a sequence that respects the Accumulation, Manipulation, Distribution structure, formed across three candles:
- The first candle is a long accumulation candle.
- The second candle is a manipulation candle, where price creates a wick that pushes above the previous candle's high but comes back down and closes inside the previous candle's body.
- The third candle is the distribution candle, where price breaks the second candle's lower wick and moves into (and beyond) the first candle's low.
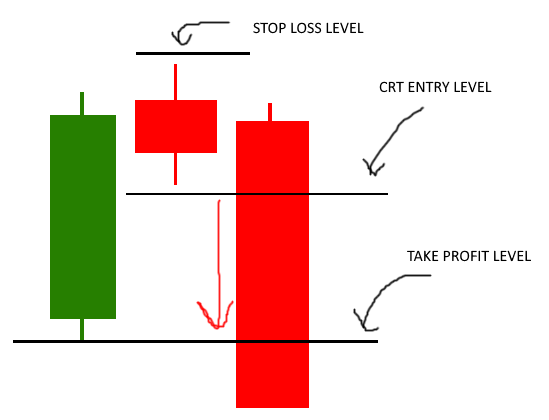
The entry trigger for this model is the break of the second candle's lower wick (the reverse applies for a long entry model). That trigger is analyzed on a faster, lower timeframe — for example, if the CRT candle pattern is observed on a 1-hour timeframe, entry confirmation may be looked for on the 1-minute or 5-minute timeframe.
A lower timeframe is used for entry confirmation so the trade can be entered in a timely manner — either via a Fair Value Gap, or simply by waiting for the lower timeframe to close below the second candle's lower wick.
One advantage of this model is that the take-profit/stop-loss ratio is known before entering the trade: in general, the stop loss is placed a few ticks beyond the manipulation candle (2nd candle), and the take-profit target is the first candle's low (or high, for a long entry).
Chart Examples
These examples aren't intended to show that the strategy generates profit — they're intentionally hand-picked winning trades, chosen to avoid confusion and to illustrate the best-case scenarios where the entry setup works well. Running the strategy yourself, you'll find that many similar entry setups lead to losing trades — that's the reality of trading. The goal is expected profitability over the long run, even though some individual trades are losses.
MES, 1-Minute Chart / 1-Hour Higher Timeframe
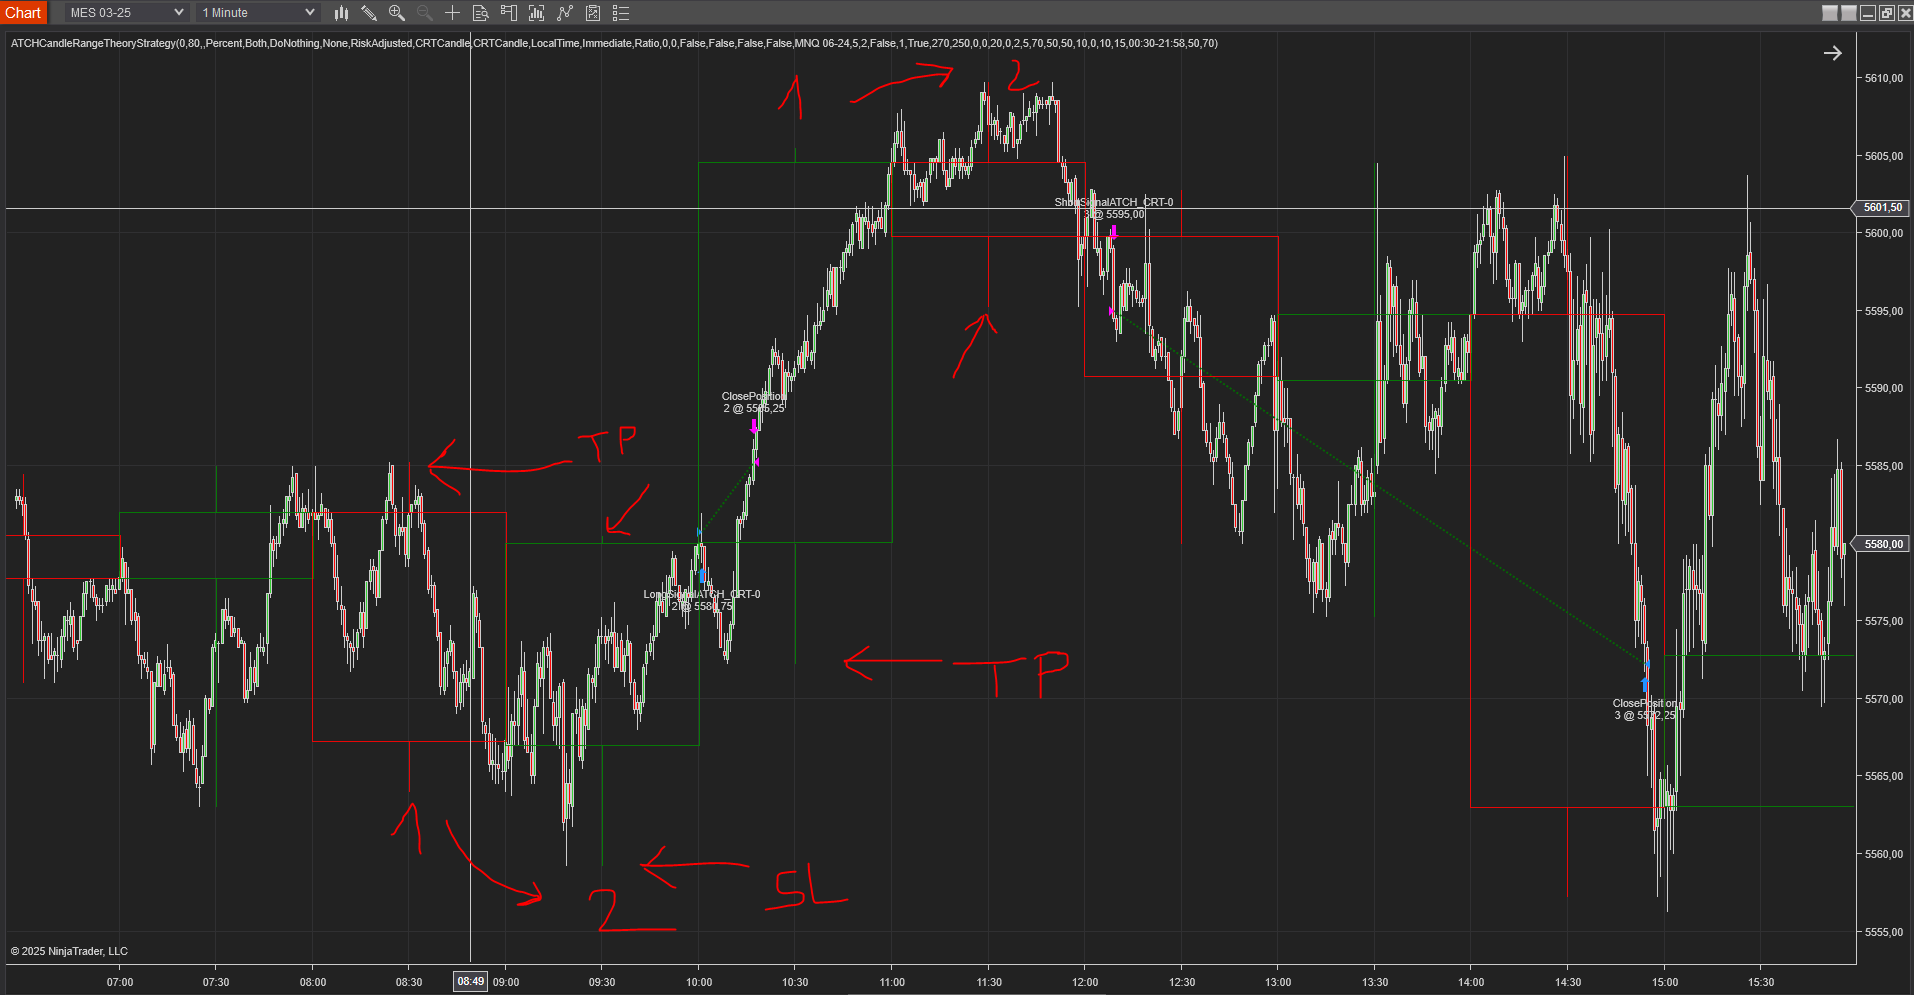
On MES, 1-minute timeframe, with the 1-hour timeframe as the higher timeframe (drawn as an overlay on the chart, which is very useful). This example shows two separate entries — the first a long entry, the second a short entry. The candles marked 1 and 2 are the candles that generated each entry, and the TP/SL markers show where the take-profit and stop-loss levels were set.
MES, 1-Minute Chart — 2x CRT Candle Take Profit
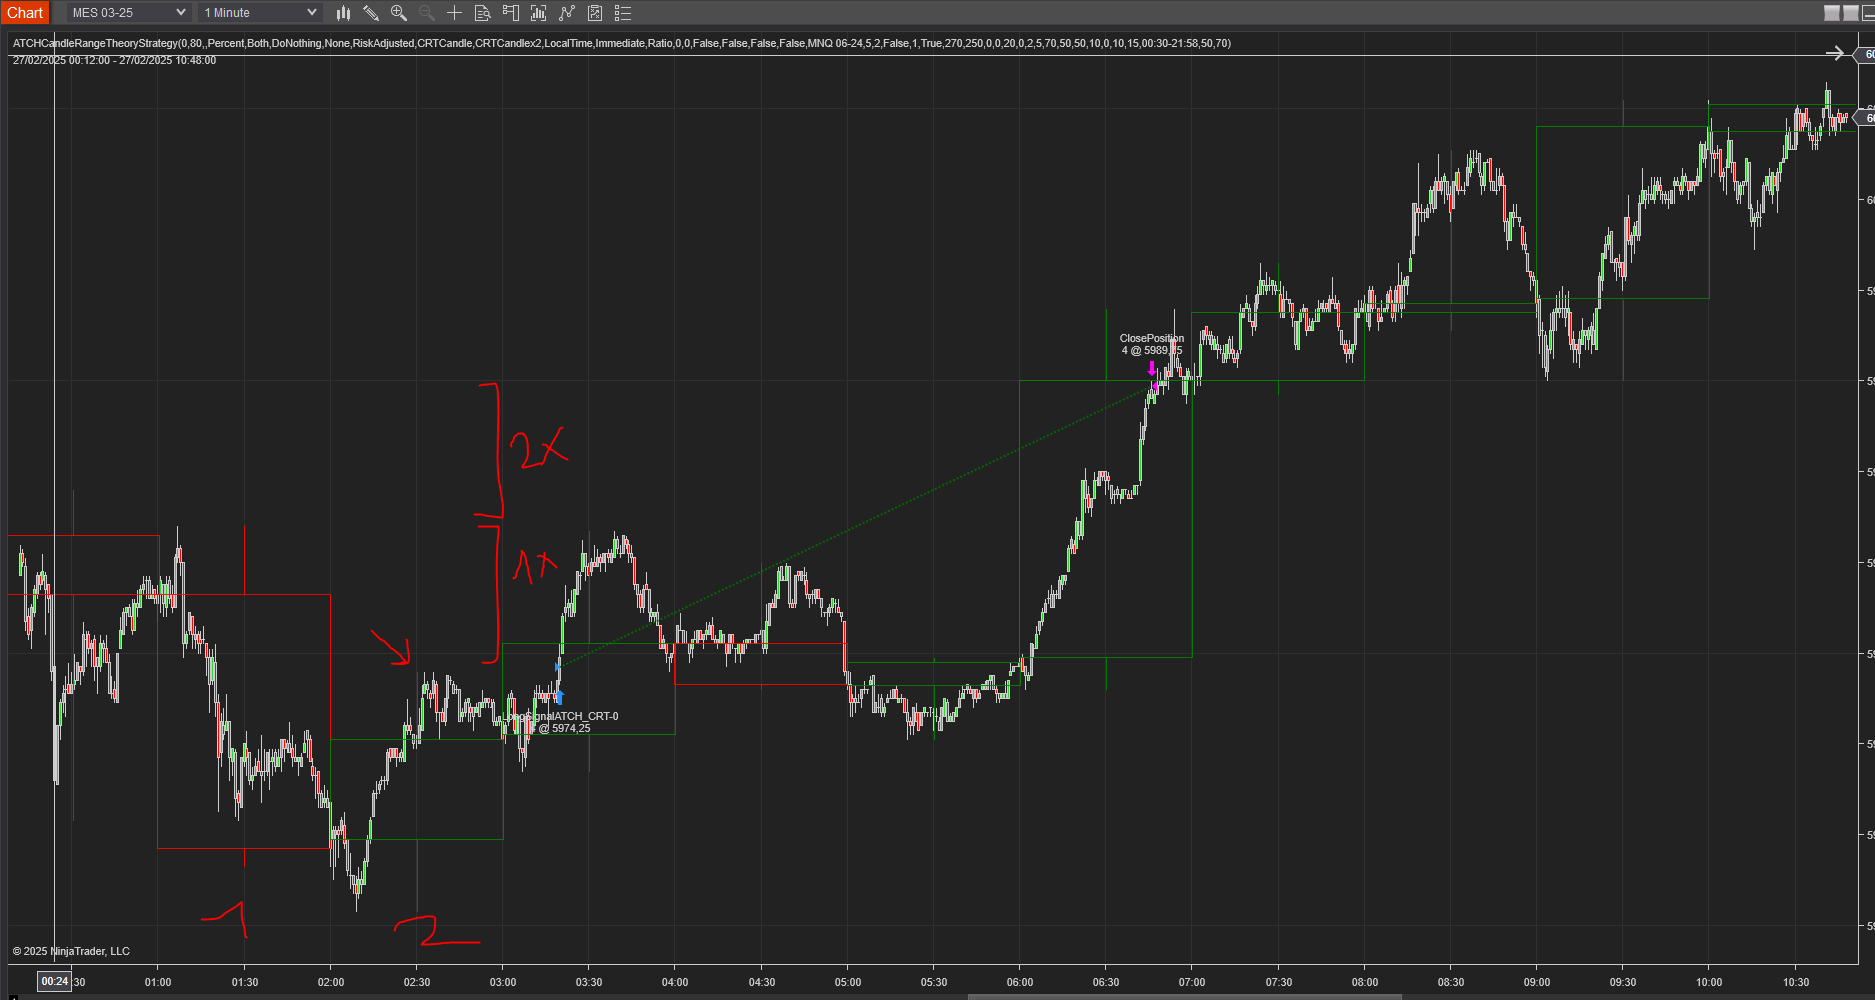
The strategy supports several take-profit and stop-loss strategies. The default CRT take profit is set to the high/low wick of the first (accumulation) candle, but this can be extended to a multiple of that range — this example illustrates the 2x factor. The 1X marker shows the first take-profit level, and 2X shows where the 2x take-profit level was set instead — producing a higher expectancy of profit over the long term.
Features
The CRT strategy has a set of unique features:
- Robust in-house implementation of the Candle Range Theory entry setup algorithm
- No pending orders are placed — only market orders, which produces no rejected orders or partial fills
- Full-auto strategy that can be scaled into multiple instances
- Precise backtesting capabilities following NinjaTrader's official best practices, achieving precise entry/exit backtesting at the tick level
- A robust in-house order management library, resistant to connection loss, that works seamlessly on Rithmic accounts or NinjaTrader brokerage accounts
- On-chart command buttons to manually manage positions when needed
- A very lightweight strategy that can be run in multiple instances, even on a low-power VPS
Dynamic Quantity and Risk Management
As with all our strategies, this strategy implements two methods for setting the quantity of open positions:
- Fixed Quantity: uses the same quantity for every position. If the stop loss is variable between positions, win/loss amounts will vary too.
- Dynamic Risk-Adjusted Quantity: calculates each position's quantity from its stop loss, the maximum risk (in $) allowed per position, and the maximum allowed quantity — producing equal win/loss amounts across all positions regardless of stop loss width.
Position Management
As with all our strategies, this strategy implements multiple position management methods:
- ATM Strategy: delegate position management entirely to your own ATM strategy, selected from a drop-down.
- SuperTrend: uses the SuperTrend indicator to trail the stop loss and manage exits dynamically.
- Classic Trailing Stop: trails the stop loss based on a trigger and a trailing amount.
The strategy also allows setting the stop loss based on multiple strategies and the take profit based on a ratio — see the Parameters section for details.
Account Management
The strategy implements daily stop-trading triggers based on the net winning position count, the net losing position count, or a target realized net profit or net loss.
Parameters
We try to keep the parameters to a minimum — only the most important are exposed.
| General | |
| Execute Historical Trades | Enables executing trades when the strategy runs in Historical, Backtest, or Optimization mode — should be unchecked when running Live. |
| Daily TakeProfit Target | The strategy stops for the day once this daily take-profit amount is reached after a position closes. Ignored when set to 0. |
| Daily StopLoss Limit | The strategy stops for the day once the daily loss limit is reached after a position closes (positive value — e.g. 300 stops trading once realized PnL ≤ -$300). Ignored when set to 0. |
| Stop @ Winning Count | Stops trading for the day once the net winning-trade count reaches this value. Ignored when set to 0. |
| Stop @ Losing Count | Stops trading for the day once the net losing-trade count reaches this value. Ignored when set to 0. |
| Render Opacity (1-100) | Opacity used to render objects on the chart. |
| Execute on Different Instrument | Executes trades on a different instrument than the active chart's — e.g. run logic on Minis but execute on Micros to better manage risk. All risk calculation happens on the execution instrument, and trades on a different instrument aren't drawn on the chart. |
| Execution Instrument | Choose from a list of Micros available on your NinjaTrader connection as the instrument trades execute on. Historical and live trades won't be drawn on the chart in this case. |
| Market Structure | |
| Higher TimeFrame | Selects the higher timeframe the entry-setup analysis runs on. Make sure to select a timeframe higher than, and of the same type as, the active chart's — e.g. you can't select a Tick-based higher timeframe while the chart's timeframe is Minute-based. |
| Higher TimeFrame Period | Sets the period of the higher timeframe. |
| Entry Setup | |
| Time Zone |
The time zone used for the Trade Time parameter below. Futures markets operate on US Eastern time (EST), so this lets you specify the trading interval relative to your own machine's time zone instead.
|
| Trade Time |
The time interval(s) during which the strategy is allowed to place trades. Some examples:
|
| Quantity Strategy |
|
| Max Qty | Maximum allowed quantity when Risk Adjusted is selected — useful since some prop firms enforce order-quantity limits that can invalidate an account. |
| Long/Short Entry Mode |
Useful if you already have a directional daily bias and want to restrict trading to one direction.
|
| Trade Entry Mode |
Entry mode after a valid CRT sequence is detected.
|
| Min CRT Ticks | The minimum size, in ticks, of the CRT candle's profit area. A CRT candle whose range is too small to be worth trading — i.e. the distance from the entry signal to the take-profit wick is very small — is skipped. |
| Min CRT Ratio | The CRT ratio is the win:loss ratio of the trade — the distance from the entry signal to the take-profit wick (the first CRT candle's high wick for a long, low wick for a short), divided by the distance from the entry price to the stop-loss wick (the first CRT candle's low wick for a long, high wick for a short). This parameter sets the minimum ratio allowed, skipping entries below it. |
| SuperTrend Entry Filter | Enables/disables using the SuperTrend indicator as an entry filter — when enabled, long trades are only allowed when SuperTrend is bullish, and short trades only when it's bearish. |
| Order Qty | Used only when Quantity Strategy is Fixed — the fixed quantity per trade (and per quantity increase, if the order management mechanism scales in). Typically 1 or 2. |
| SuperTrend | |
| This section is only visible when SuperTrend Entry Filter is enabled. | |
| SuperTrend Mode |
|
| Period / Multiplier / Moving Avg. Type / Smooth | Standard SuperTrend calculation parameters — period, band multiplier (a wider band the higher the value), moving-average type, and smoothing period. |
| Run SuperTrend on Higher TF | Calculates the SuperTrend indicator on the higher timeframe's price series instead of the chart's own timeframe. |
| Order Management | |
| Order Management Strategy |
|
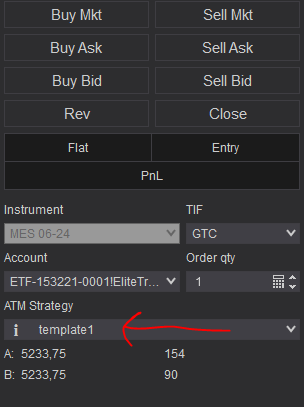
| ATM Strategy Template Name | Only used with the ATM Strategy order management method — the exact template name of your custom ATM strategy (matching the image above, this would be template1). Must match an existing template, or no position will be opened. |
| On Opposite Signal |
The strategy's behavior whenever an opposite signal occurs while a position is open.
|
| Enable Price Breakeven | Enables/disables the price-based breakeven mechanism. |
| Breakeven Price Strategy |
|
| Breakeven Price Trigger | Available if price-based breakeven is enabled — the trigger value needed to move the stop loss to breakeven. |
| Enable Time Breakeven | Enables/disables the time-based (in minutes) breakeven mechanism. |
| Breakeven Time Trigger | Available if time-based breakeven is enabled — the trigger value, in minutes, needed to move the stop loss to breakeven. |
| StopLoss Strategy |
|
| TakeProfit Strategy |
|
| Target Risk Per Trade ($) | Maximum risk, in dollars, per position — used before opening a trade to verify the calculated stop loss respects this limit; if not, the trade is skipped. |
| Max Allowed Risk Per ($) | Only used with Risk Adjusted quantity — controls how far the real calculated risk is allowed to deviate from the Target Risk (since an exact match is rarely possible). |
| Stop Loss Points | Available when the StopLoss Strategy is set to Points. |
| Take Profit Currency | The take-profit amount in dollars, used when the Fixed Currency Value take-profit strategy is selected. If not used, set this to a high value so it doesn't interfere with the ratio-based strategies. |
| Scale out % Qty at % Target | Closes a percentage of the position's quantity once price hits a percentage of the profit target (rounded down when fractional — e.g. 50% of a 5-lot position closes 2 contracts). |
| Scale out at % Target | The percentage of the profit target that triggers the scale-out mechanism. |
| Scale out % Qty | The percentage of the quantity closed by the scale-out mechanism. |
| Take Profit Points | Available when the TakeProfit Strategy is set to Points. |
| Trailing Stop Parameters | |
| Trailing Stop Strategy |
Available with the Classic Trail Stop order management method.
|
| Trailing Stop Trigger | The trigger (in points or ratio) for the Classic Trail Stop method. |
| Trail Amount | The amount (in points or ratio) trailed once the trigger is hit. |
| Command Buttons | |
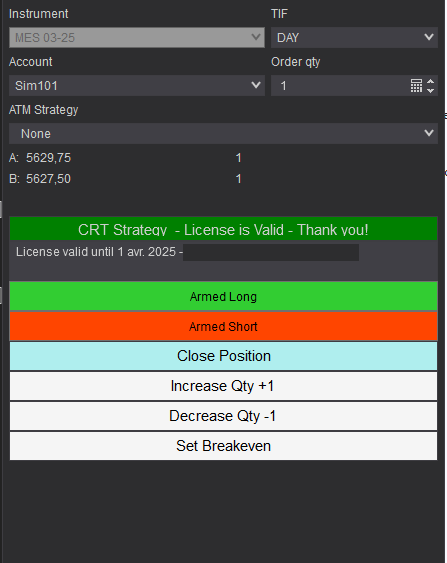
The strategy exposes manual command buttons on the Chart Trader panel — make sure it's displayed on your active chart.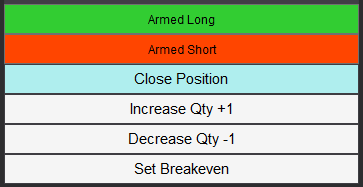 | |
| Arm/Disarm Buttons | Manually enable/disable entering long or short trades — useful if you have a directional bias. |
| Close Position Button | Immediately flattens the position on the active instrument without restarting the strategy, which keeps looking for new trades afterward. |
| Increase / Decrease Qty Button | Adjusts the current active position's quantity by ±1 contract. |
| Set Breakeven Button | Moves the open position's stop loss to breakeven, if doing so would improve it. |
Performance Reports
Past results are not a guarantee of future results. All backtesting results are for indicative purposes only.
- Commissions are included, using NinjaTrader's Lifetime license commission schema, for realistic results.
- We follow NinjaTrader's official guide for precise intrabar-granularity backtesting using additional tick-level data series, and only use market orders — never pending orders — in both real-time and backtest modes.
No performance reports have been uploaded for this strategy yet.
Download & Installation Instructions
License Requirements
At automated-trading.ch you can choose to either purchase a monthly subscription to use our premium products, or use our free products without subscribing.
In both cases, you need to create an account so you can get a License you can use for both premium and free products.
To obtain your license, simply sign up and then get your license on the billing page.
Download
You can also download this strategy — and every other automated-trading.ch strategy or indicator — anytime from your centralized Downloads page.
Installation Steps
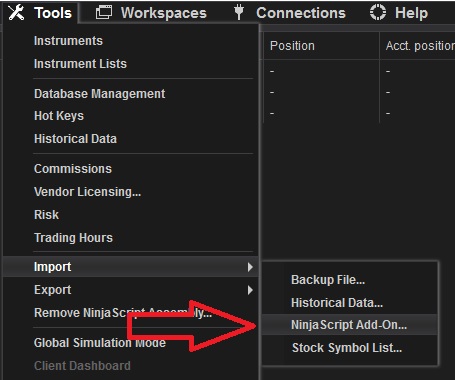
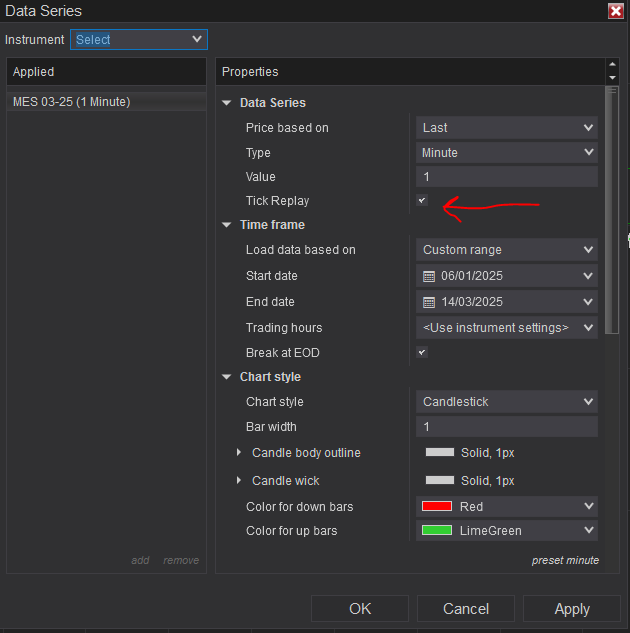
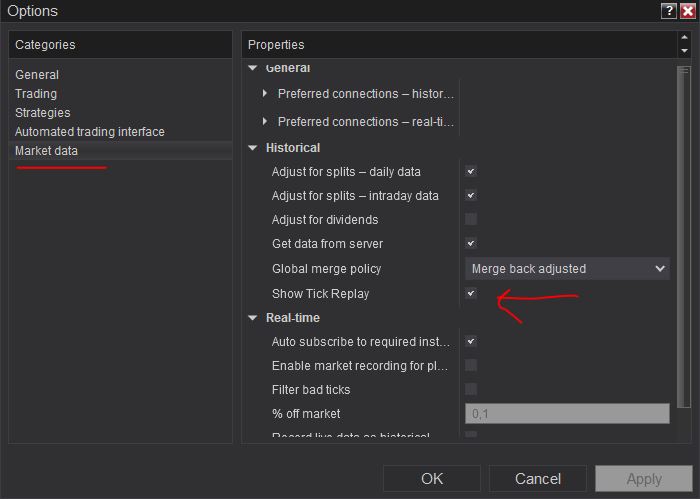
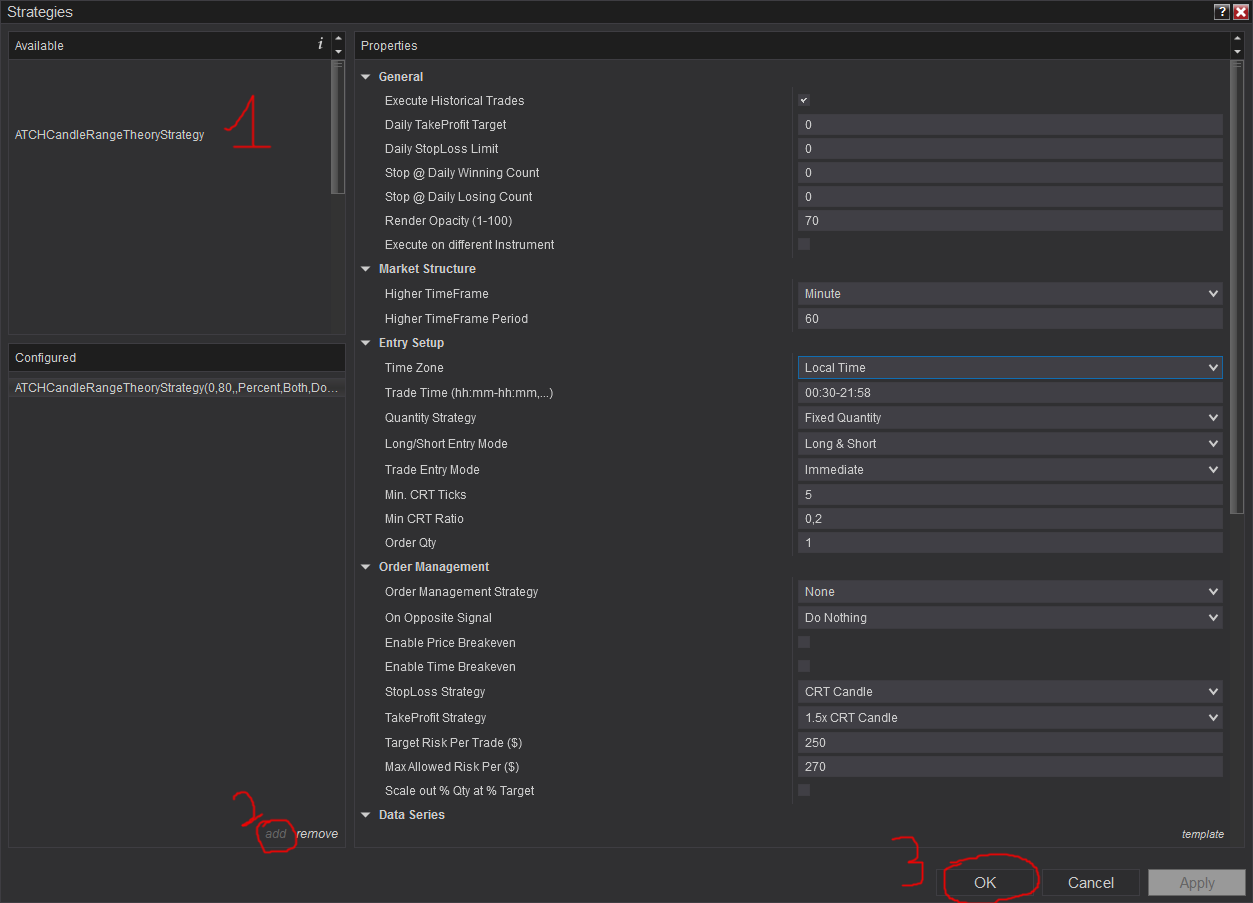
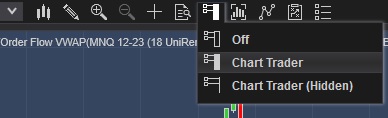
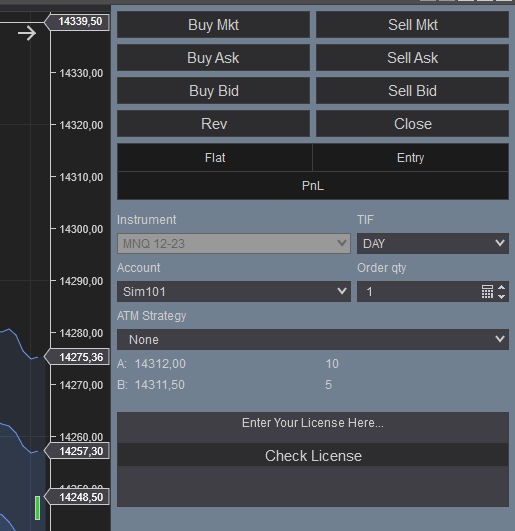
Frequently Asked Questions
General
Billing
Skeptics
Release Notes
- Bug Fix: fix error when running without supertrend
- Bug fix: SuperTrend MA Type was always taking HMA, now takes selected parameter type; Fix SL & TP manual drag & drop issues; Fixed price breakeven logic when take profit strategy is Fixed Value; Removed "Dollar Cost Averaging" order management method; Supertrend added as Order Management method; Added New stoploss strategy: SuperTrend; Supertrend can run on Lower or Higher timeframe
- Bug Fix: Error when using ATM Strategy
- First Release of the strategy