

Fair Value Gap Scalper Strategy
 Created 02 Jun 2024
·
Updated 05 Apr 2025
Created 02 Jun 2024
·
Updated 05 Apr 2025
The Fair Value Gap Scalper Strategy is a Premium mechanical strategy for the NinjaTrader 8 platform. The strategy can be used to pass propfirm evaluation challenges.
Prerequisites
To properly use this strategy you should have the following prerequisites available.
- NinjaTrader 8, with any license type. Click here to download
- An automated-trading.ch account with an active Premium Subscription
Important Disclaimer
We strongly recommend that you never run your algorithmic trading systems on your hard-earned real money. You should always minimize your risk and run your strategies on trader funding programs, so the maximum amount you risk losing is the monthly subscription fee you pay those programs.
This strategy has two entry setups, both based on confluence between Fair Value Gaps on a higher timeframe and a lower timeframe.
The strategy analyzes two timeframes simultaneously, looking for entries based on Fair Value Gaps that occur on both. The two timeframes should be of the same type — both time-based, or both range-based, or both tick-based, and so on. The strategy runs on the lower (faster) timeframe, while the higher (slower) timeframe is selected as a parameter — for example, running on a 30-second timeframe as the lower timeframe while the 5-minute timeframe is set as the higher timeframe.
Here is the algorithm the strategy uses to find entries:
- The strategy searches for a Fair Value Gap on the higher timeframe.
-
Once that FVG occurs, the strategy reacts to one of two possible outcomes:
- The price moves away from the higher-timeframe FVG without pulling back and retesting it — the FVG is considered invalid, and the strategy resumes looking for another one on the higher timeframe.
- The price retests the higher-timeframe FVG and another FVG then occurs on the lower timeframe — the strategy enters long or short according to the type of that FVG.
A variation of this setup, the HTF Pullback entry mode, doesn't require the second, lower-timeframe FVG to enter a trade: once price pulls back and retests the higher-timeframe FVG, a trade is entered as soon as a price bar closes above (for a long) or below (for a short) the higher-timeframe FVG zone.
Entry Setup Examples
Let's look at some chart examples. These examples aren't intended to show that the strategy generates a profit — trades were intentionally handpicked to illustrate the entry setups clearly, without confusion. Running the strategy yourself will show that many of the same setups also lead to losing trades — that's the reality of trading, and the goal should be expected profitability over the long run despite some individual losses.
Example #1: HTF Pullback + LTF FVG Entry on MES
The strategy runs on the 1-minute timeframe on the MES instrument, with the higher timeframe set to 15 minutes. After a Fair Value Gap forms on the higher timeframe, the strategy waits for an FVG on the lower timeframe. As soon as that lower-timeframe FVG closes, a long trade is opened, with the stop loss set at the lower zone edge of the higher-timeframe FVG and a 2:1 take profit. Price later moved back to the higher timeframe and made a second retest, followed by another lower-timeframe FVG confirming a second entry.
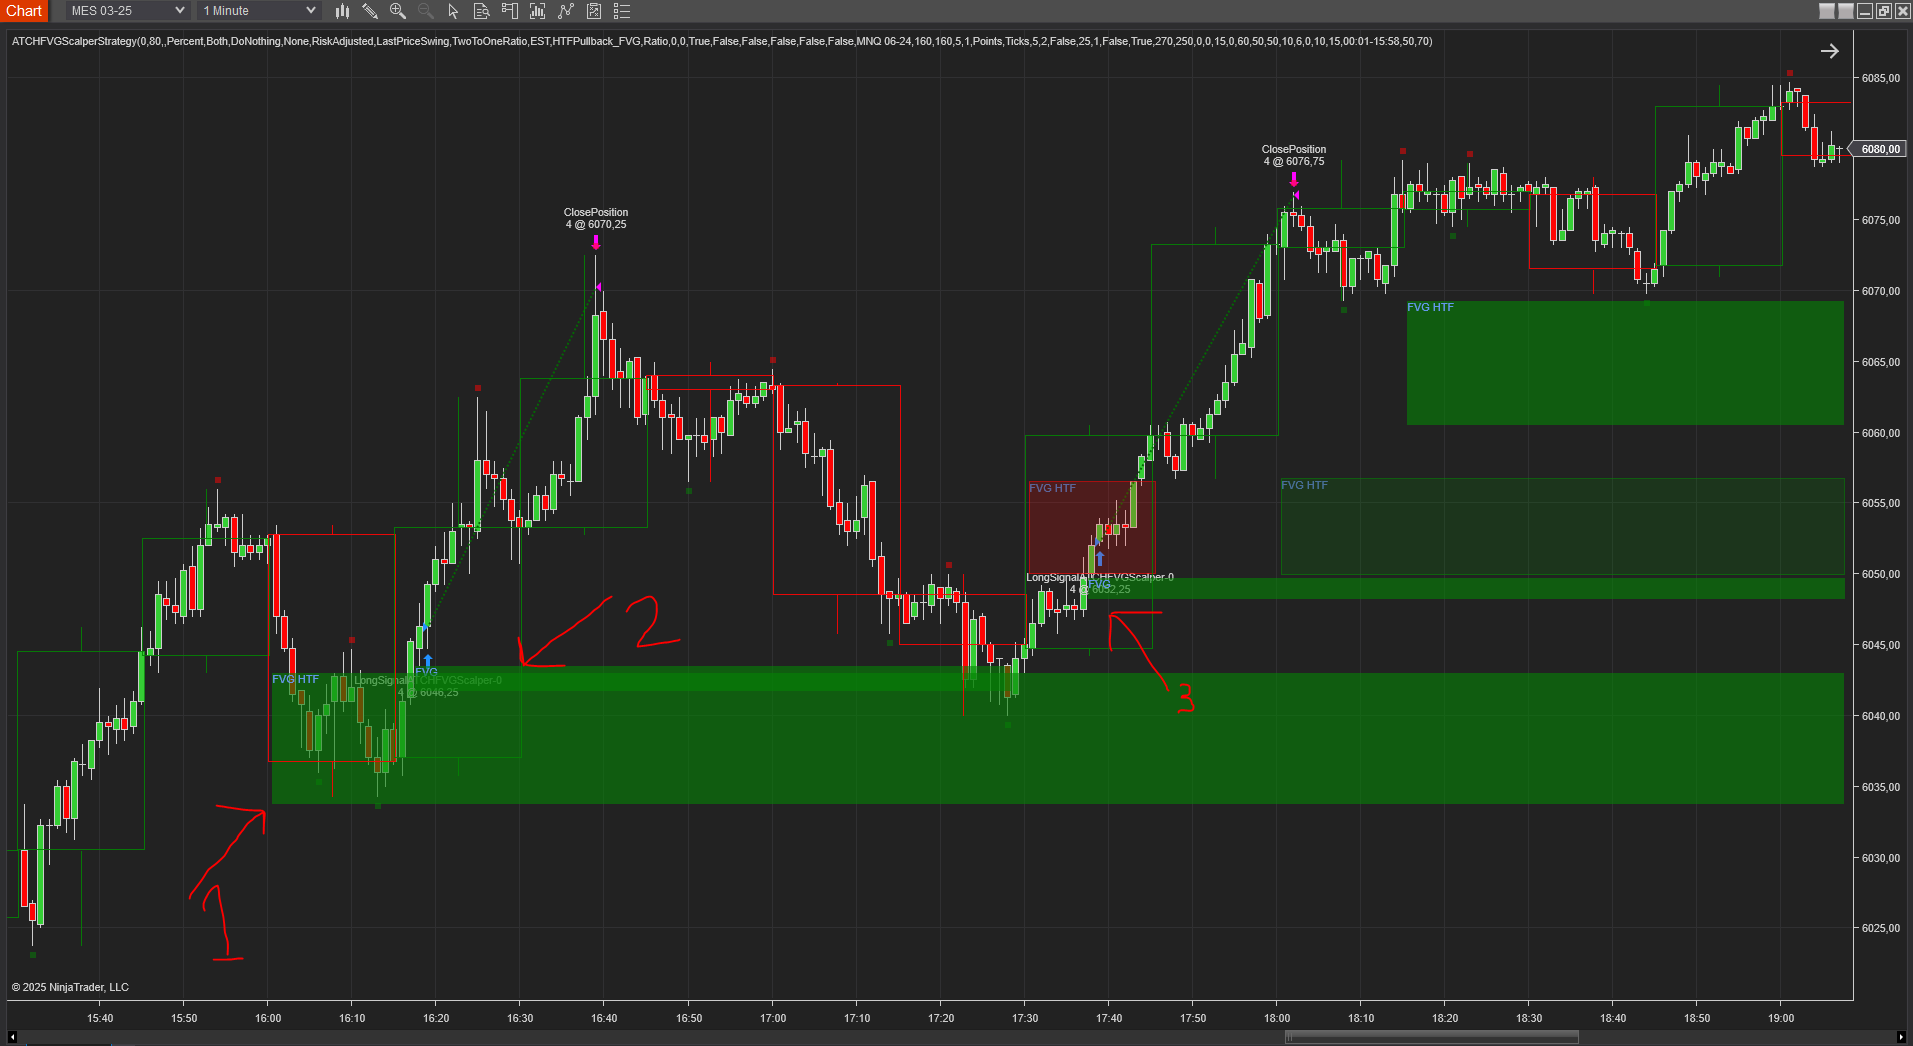
Here is a second similar example:
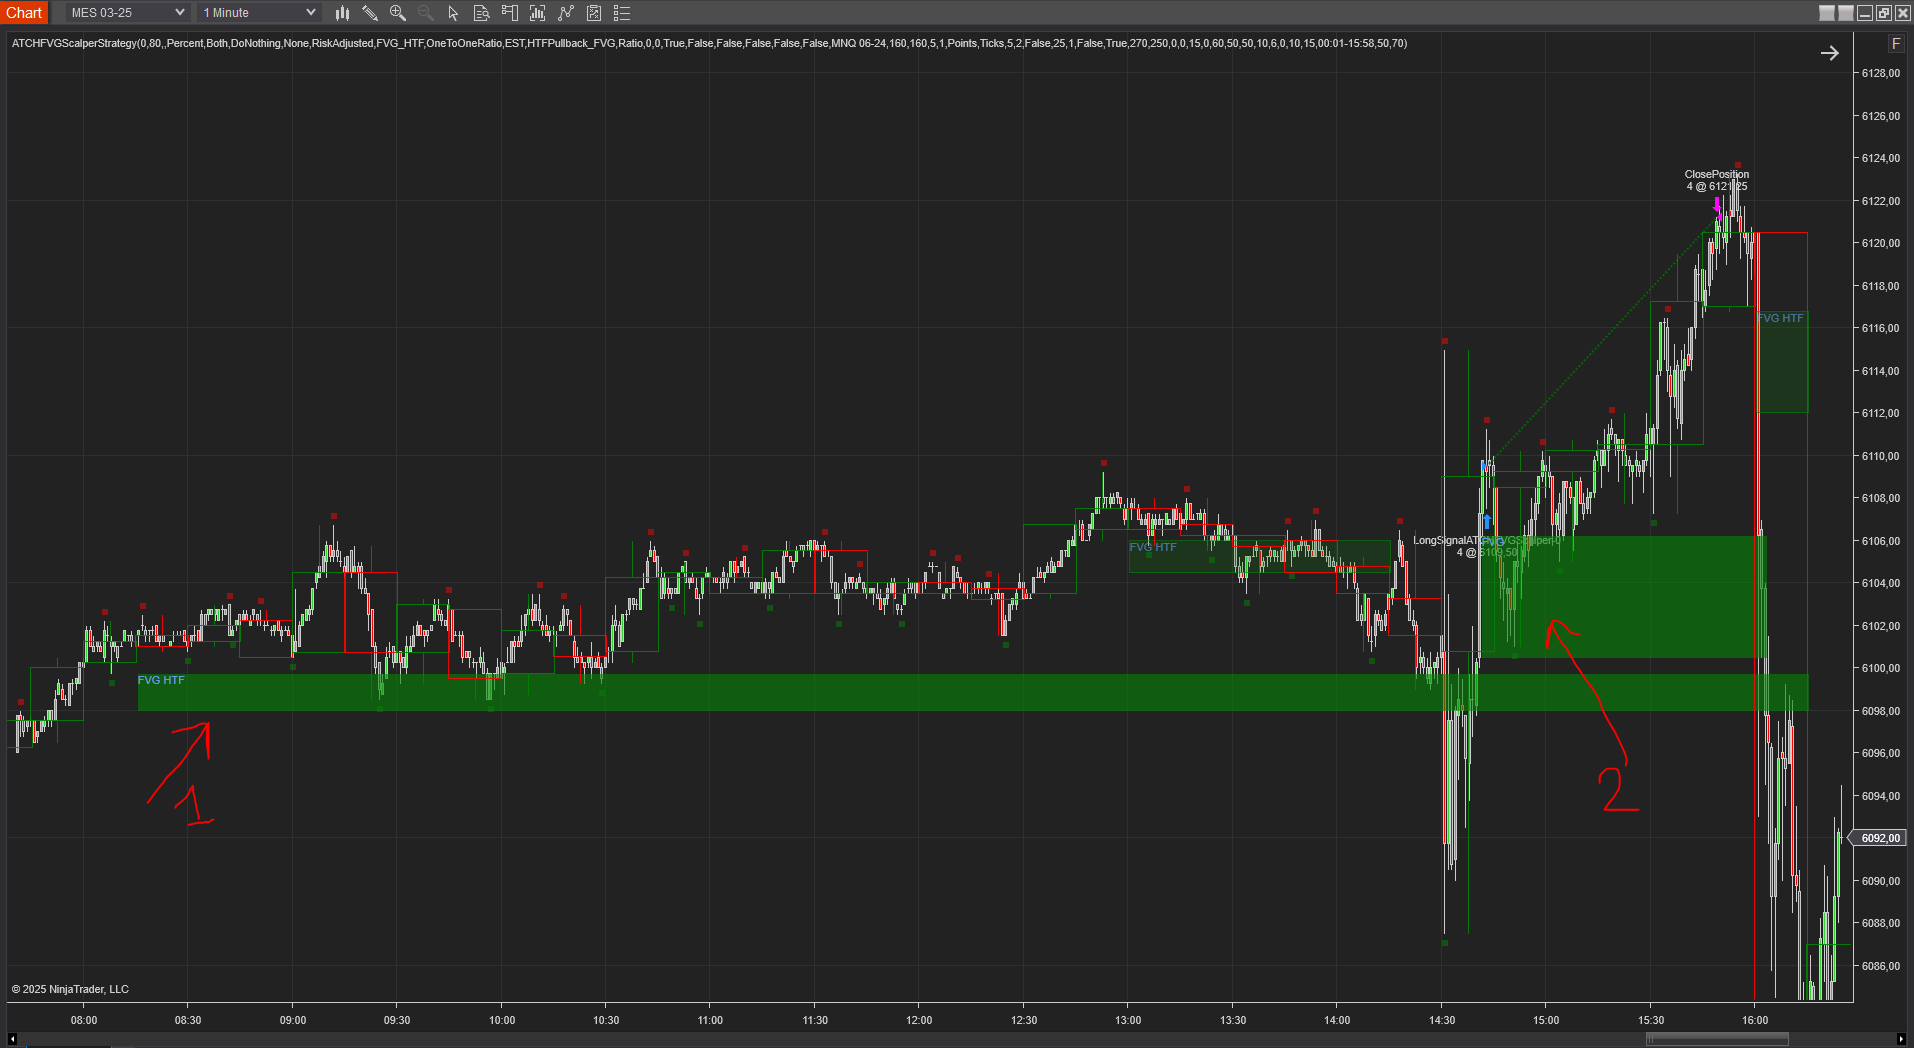
Example #2: HTF Pullback Only Entry on MES
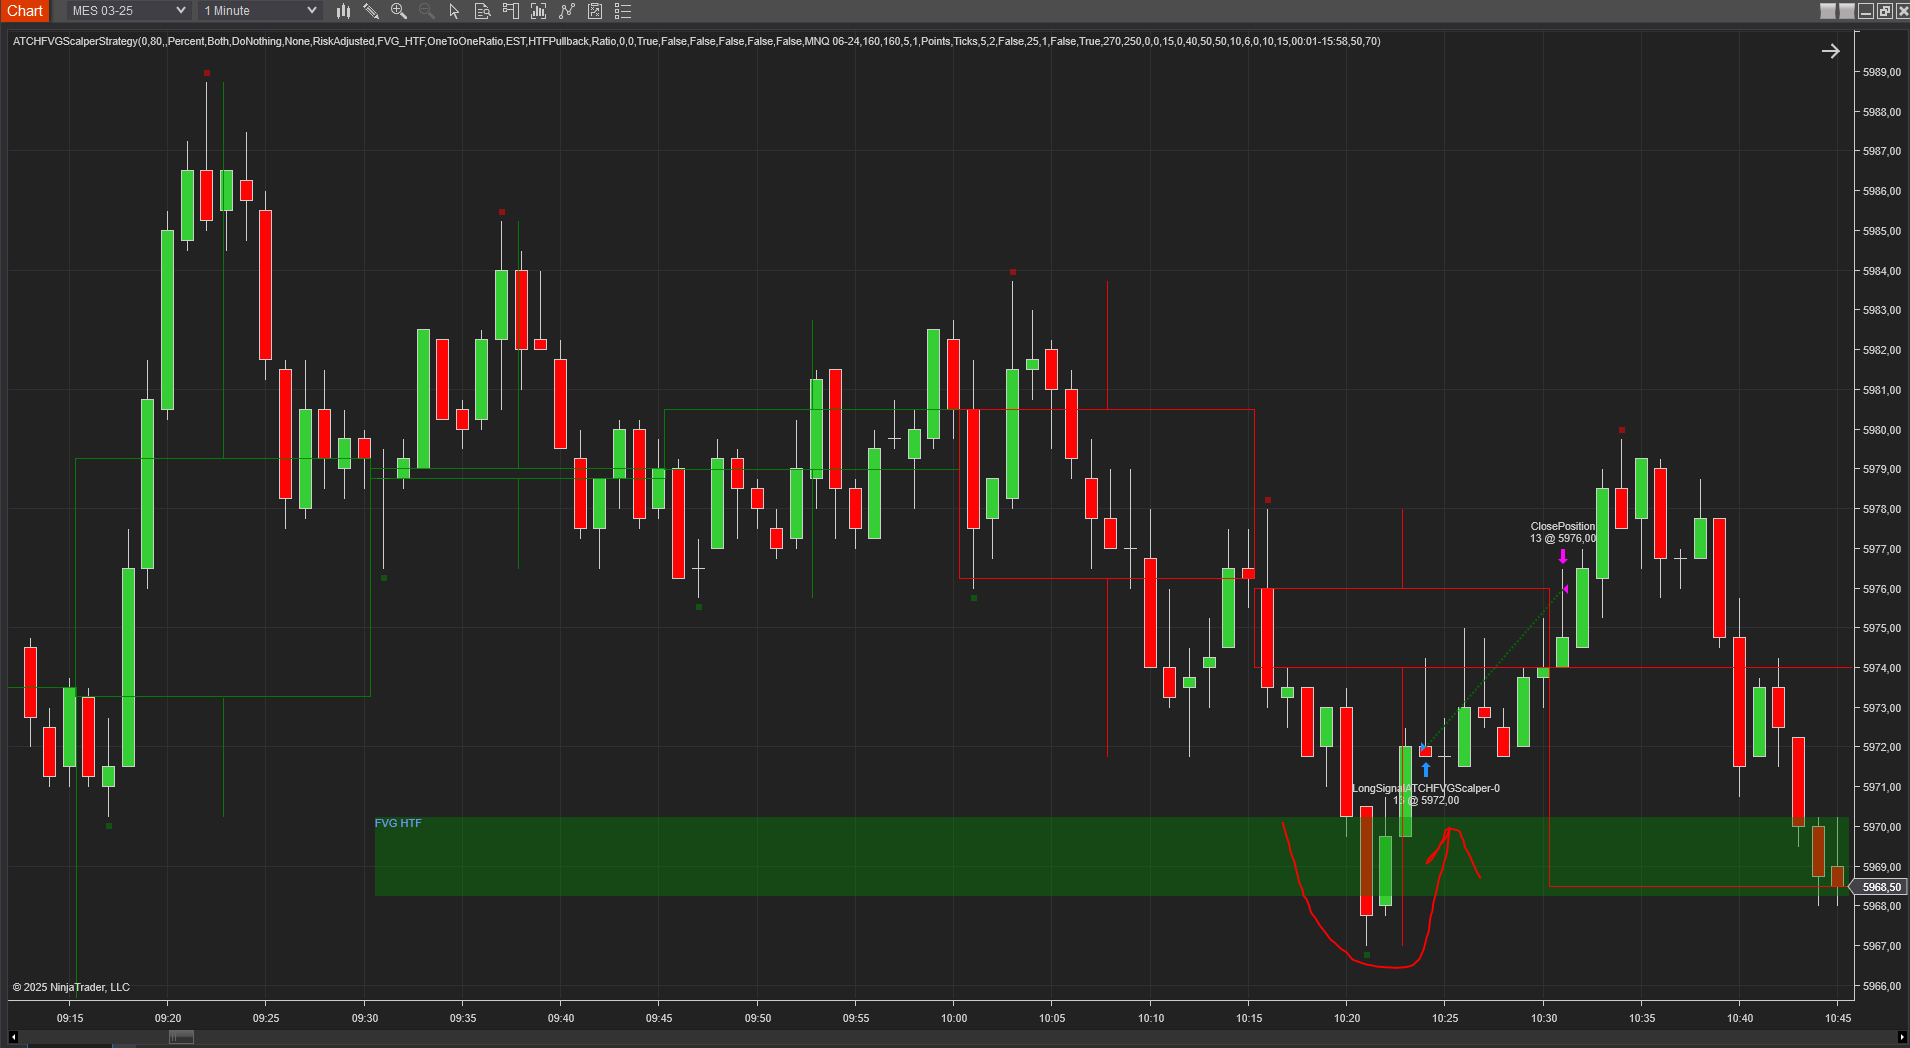
Running on MES on the 1-minute timeframe with the higher timeframe set to 15 minutes, and the entry mode set to HTF Pullback. Price pulled back into a previously formed higher-timeframe FVG, then a price bar closed above the FVG's upper price level, triggering a long entry. The stop loss was set to the lower level of the FVG, and the take profit was 2:1.
Example #3: Invert Mode on a Higher-Timeframe FVG Pullback
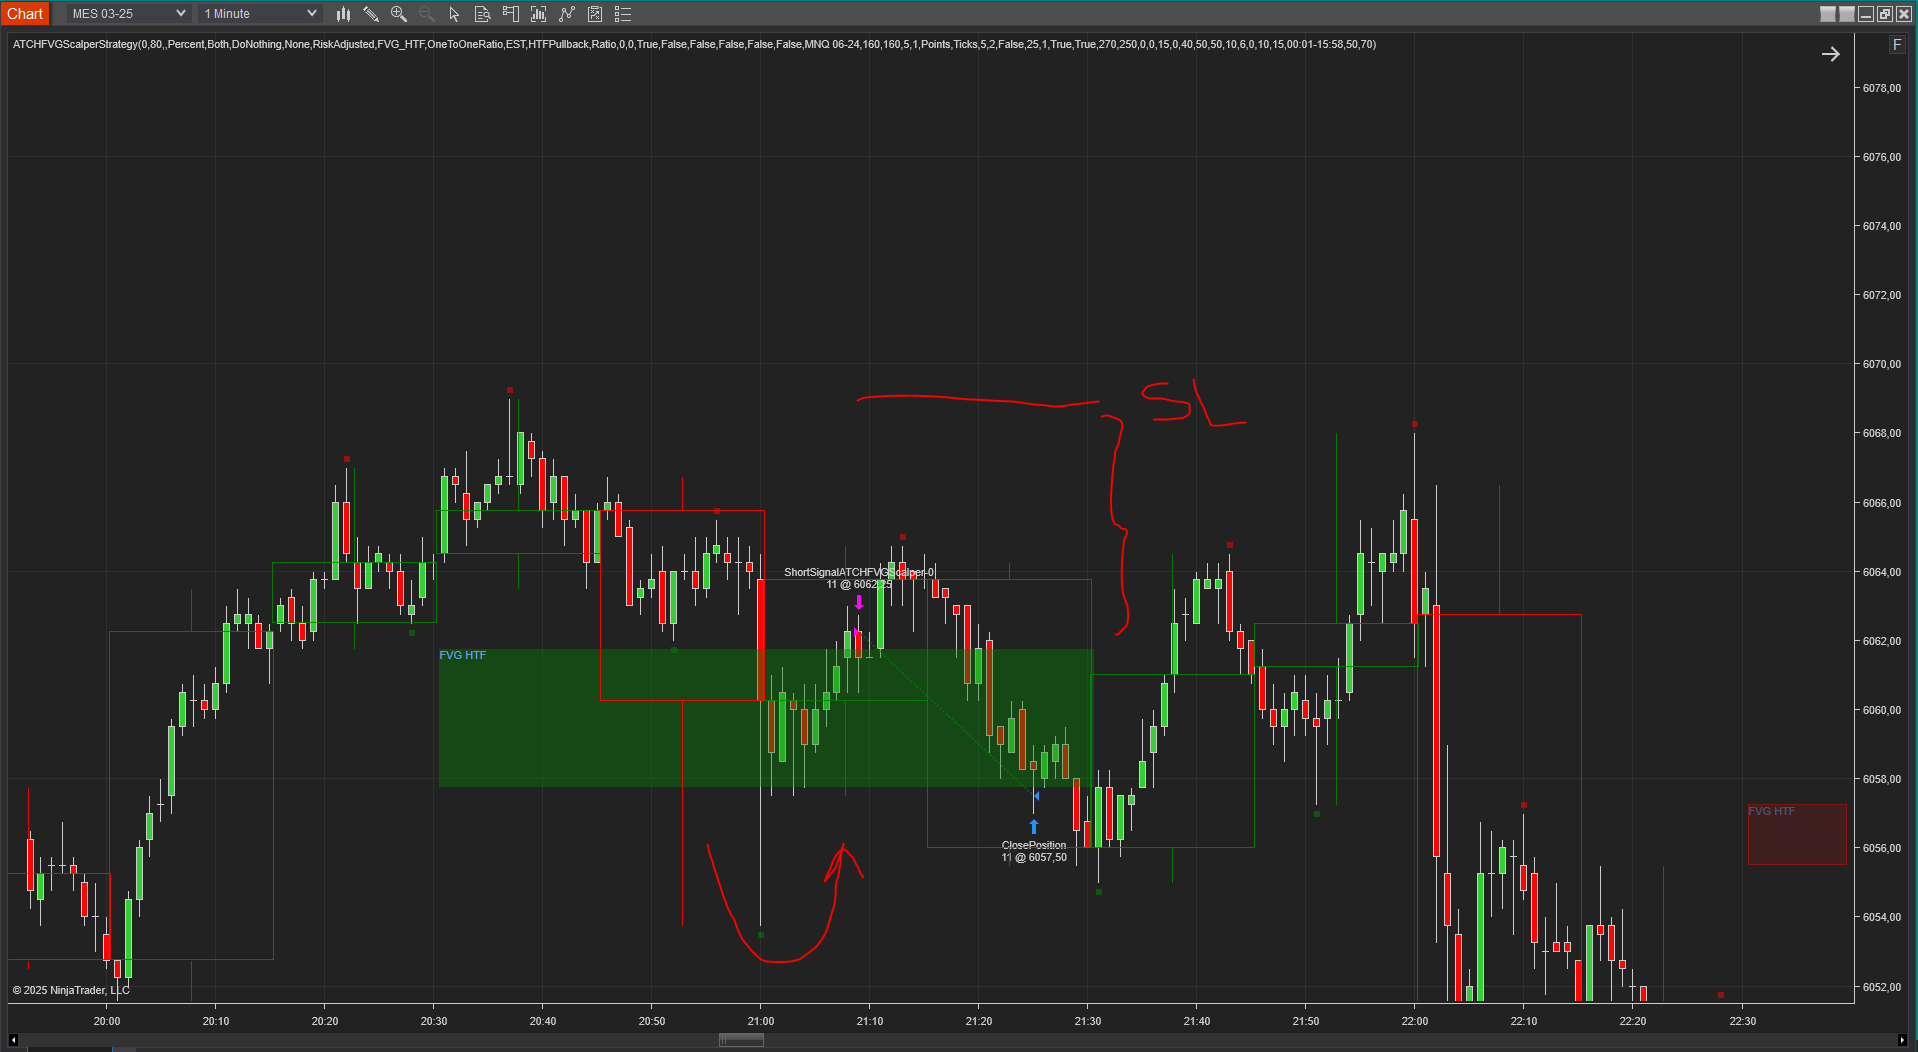
This example demonstrates the invert entry logic. As in the previous example, price pulled back and retested a higher-timeframe FVG and closed above it with a bullish candle — but with the Invert Entries parameter checked, the strategy went short instead of long, and the stop loss and take profit levels were inverted along with it: the take profit was set to the lower FVG edge, and the stop loss was calculated with a 1:1 win/loss ratio. This invert logic is useful in choppy market regimes.
Example #4: No Entry, Price Moves Away From the Higher-Timeframe FVG
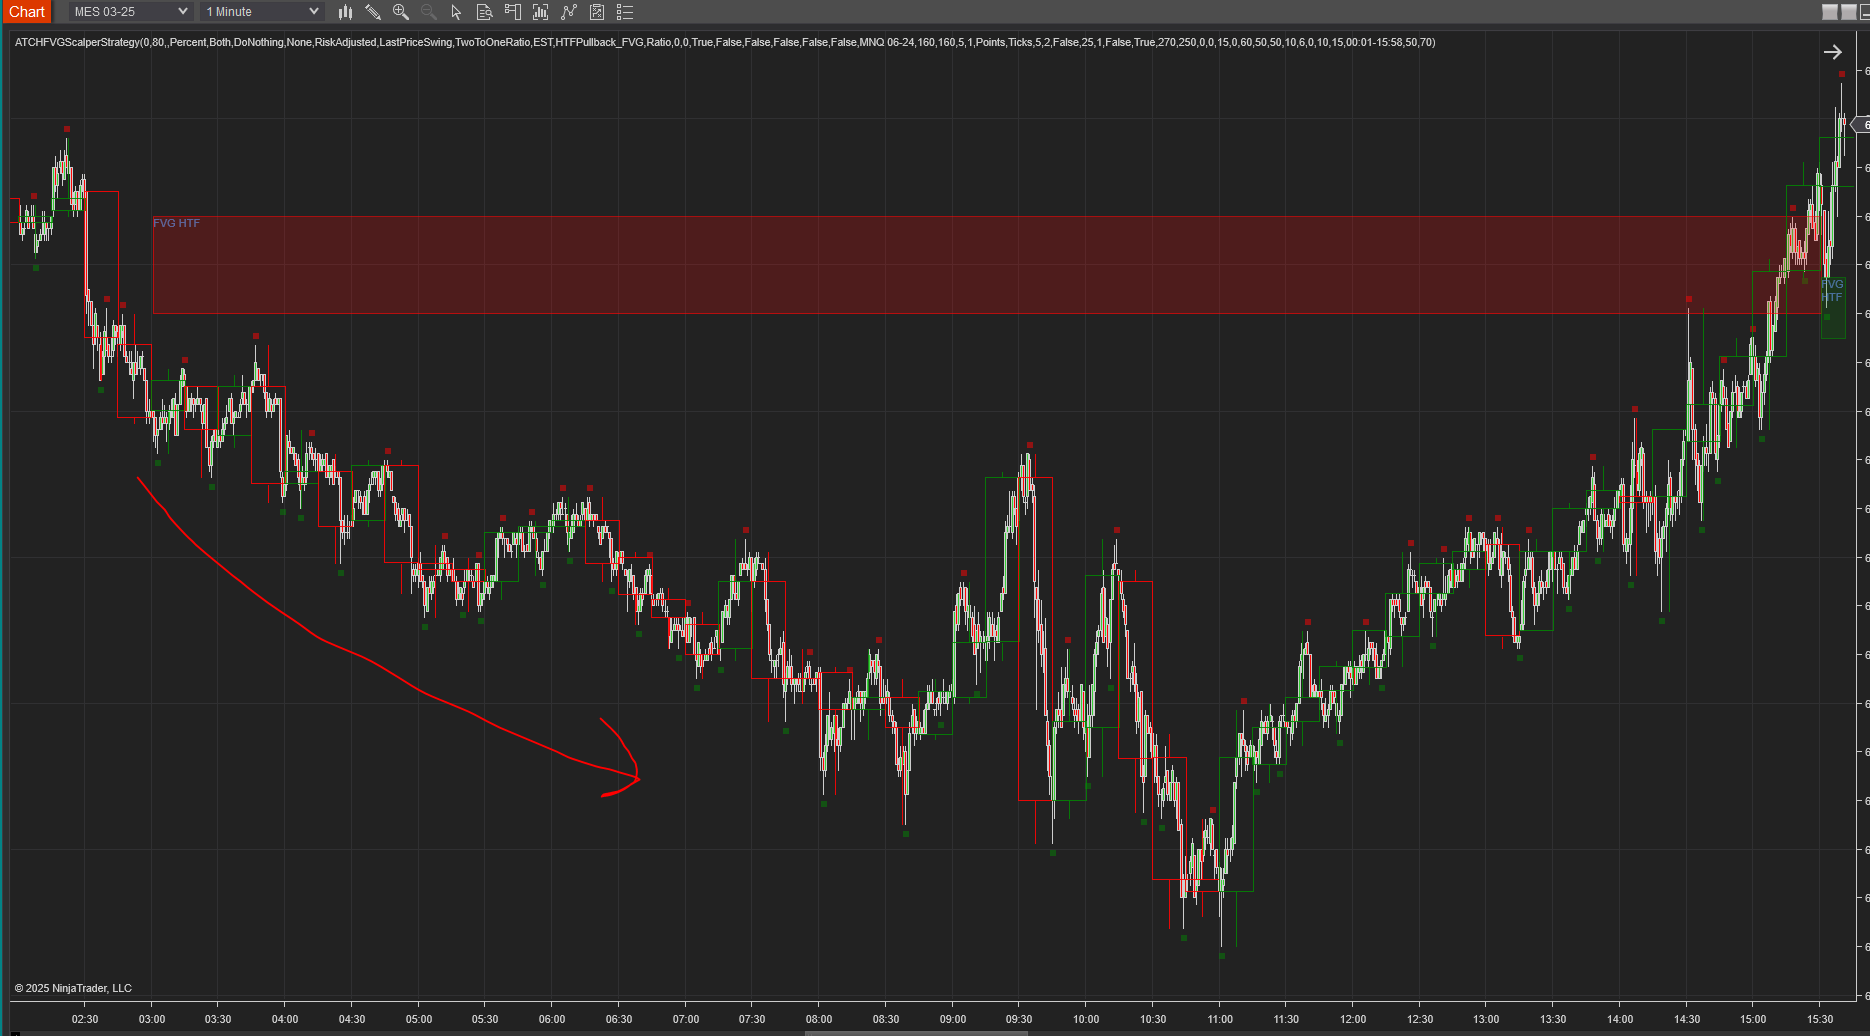
This example illustrates the case where, after an FVG forms on the higher timeframe, price moves away from it without a pullback or retest — marking the FVG as invalid and producing no trade.
Features
The FVG Scalper strategy has a set of unique features:
- No pending orders are placed — only market orders
- Full-auto strategy that can be scaled into multiple instances
- Precise backtesting capabilities following NinjaTrader's official best practices, achieving precise entry/exit backtesting at the tick level
- A robust in-house order management library, resistant to connection loss, that works seamlessly on Rithmic accounts or NinjaTrader brokerage accounts
Dynamic Quantity and Risk Management
As with all our strategies, this strategy implements two methods for setting the quantity of open positions:
- Fixed Quantity: uses the same quantity for every position. If the stop loss is variable between positions, win/loss amounts will vary too.
- Dynamic Risk-Adjusted Quantity: calculates each position's quantity from its stop loss, the maximum risk (in $) allowed per position, and the maximum allowed quantity — producing equal win/loss amounts across all positions regardless of stop loss width.
Position Management
As with all our strategies, this strategy implements multiple position management methods:
- ATM Strategy: delegate position management entirely to your own ATM strategy, selected from a drop-down.
- Dollar Cost Averaging (Grid): increases the position's quantity as price moves against it, bringing the average entry price closer to the current price and aiming to close the position at breakeven on a pullback.
- Classical Trailing Stop: trails the stop loss based on a trigger and a trailing amount.
The strategy also allows setting the stop loss based on multiple strategies and the take profit based on a ratio — see the Parameters section for details.
Account Management
The strategy implements daily stop-trading triggers based on the net winning position count, the net losing position count, or a target realized net profit or net loss.
Parameters
We try to keep the parameters to a minimum — only the most important are exposed.
| General | |
| Execute Historical Trades | Enables executing trades when the strategy runs in Historical, Backtest, or Optimization modes — should be unchecked when running Live. |
| Daily TakeProfit Target | The strategy stops for the day once this daily take-profit amount is reached. Ignored when set to 0. |
| Daily StopLoss Limit | The strategy stops for the day once the daily loss limit is reached (positive value — e.g. 300 stops trading once realized PnL ≤ -$300). Ignored when set to 0. |
| Stop @ Daily Winning Count | Stops trading for the day once the net winning-trade count reaches this value. Ignored when set to 0. |
| Stop @ Daily Losing Count | Stops trading for the day once the net losing-trade count reaches this value. Ignored when set to 0. |
| Render Opacity (1-100) | Opacity used to render objects on the chart. A value of 20 is recommended. |
| Execute on Different Instrument | Executes trades on a different instrument than the active chart's — e.g. run logic on Minis but execute on Micros to better manage risk. All risk calculation happens on the execution instrument, and trades on a different instrument aren't drawn on the chart. |
| Execution Instrument | Choose from a list of Micros available on your NinjaTrader connection as the instrument trades execute on. Historical and live trades won't be drawn on the chart in this case. |
| Market Structure | |
| Higher TimeFrame | Selects the higher timeframe the entry-setup analysis runs on. It must be higher than, and of the same type as, the active chart's timeframe — e.g. you can't select a Tick-based higher timeframe while the chart is on a Minute timeframe. |
| Higher TimeFrame Period | Sets the period of the higher timeframe. |
| Draw Higher Timeframe Candles | Enables drawing (overlaying) higher-timeframe candles on top of the active chart. |
| Swings Period | Also known as Swing Sensitivity. After each bar close, a swing (a higher high, higher low, lower high, or lower low) can be detected, and a following bar can still cancel it by forming a new swing of the same type — this parameter sets how many bars must separate two swings of the same type. Increasing it decreases the overall number of swings detected; decreasing it increases them. Common values are 3, 6, or 12. |
| Ignore FVG Older Than (X) Days | Filters out FVGs older than this number of days from the entry logic. Those FVGs are still drawn, but won't generate trades. |
| Entry Setup | |
| Time Zone |
The time zone used for the Trade Time parameter below. Futures markets operate on US Eastern time (EST), so this lets you specify the trading interval relative to your own machine's time zone instead.
|
| Trade Time |
Specifies the time intervals during which the strategy is allowed to place trades. Some examples:
|
| Quantity Strategy |
|
| Max Qty | Maximum allowed quantity when Risk Adjusted is selected — useful since some prop firms enforce order-quantity limits that can invalidate an account. |
| Invert Entries | Inverts entries from long to short and vice versa. Stop loss, take profit, and risk are all calculated first with no inversion logic, then the trade type is inverted at the last step — so the stop loss becomes the take profit and vice versa, and the risk is inverted accordingly (e.g. a 2:1 take profit becomes a 1:2 take profit, increasing the risk). Take this into account before enabling it. |
| Long/Short Entry Mode |
Useful if you already have a directional daily bias and want to restrict trading to one direction.
|
| Trade Entry Mode |
|
| Order Qty | Used only when Quantity Strategy is Fixed — the fixed quantity per trade (and per quantity increase, if the order management mechanism scales in). Typically 1 or 2. |
| Higher TF Invalidate Setup Points | How far, in points, price must move away from the higher-timeframe FVG to invalidate and reset the current active entry setup. |
| Previous Swing Breakout Filter | Enables an entry filter comparing the current price to the previous higher-timeframe candle's high/low — requiring price to be above it for a long entry, or below it for a short entry. This can improve trade quality by only trading in the direction of a higher-timeframe breakout. |
| Fair Value Gap | |
| Type of Min. Gap for HTF |
The measurement type for the higher-timeframe minimum gap.
|
| Min. Gap for HTF | The minimum gap to consider an FVG on the higher timeframe — e.g. set to 10 with the type Points, FVGs with a gap lower than 10 points are filtered out. |
| Max. Gap (Points) for HTF | The maximum gap to consider an FVG on the higher timeframe — e.g. set to 50, FVGs with a gap higher than 50 points are filtered out. |
| Type of Min. Gap for LTF |
The measurement type for the lower-timeframe minimum gap.
|
| Min. Gap for LTF | The minimum gap to consider an FVG on the lower timeframe — same filtering logic as the higher-timeframe equivalent. |
| Max. Gap (Points) for LTF | The maximum gap to consider an FVG on the lower timeframe — same filtering logic as the higher-timeframe equivalent. |
| Order Management | |
| Order Management Strategy |
|
| ATM Strategy Template Name | Only used with the ATM Strategy order management method — the exact template name of your custom ATM strategy. Must match an existing template, or no position will be opened. |
| On Opposite Signal |
|
| Enable Price Breakeven | Enables/disables the price-based breakeven mechanism. |
| Breakeven Price Strategy |
|
| Breakeven Price Trigger | Available if price-based breakeven is enabled — the trigger value needed to move the stop loss to breakeven. |
| Enable Time Breakeven | Enables/disables the time-based breakeven mechanism (in minutes). |
| Breakeven Time Trigger | Available if time-based breakeven is enabled — the trigger value, in minutes, needed to move the stop loss to breakeven. |
| StopLoss Strategy |
|
| TakeProfit Strategy |
|
| Target Risk Per Trade ($) | Maximum risk, in dollars, per position — used before opening a trade to verify the calculated stop loss respects this limit (if not, the trade is skipped), and also used to calculate quantity when the quantity strategy is dynamic. |
| Max Allowed Risk Per ($) | Only used with Risk Adjusted quantity — controls how far the real calculated risk is allowed to deviate from the Target Risk (since an exact match is rarely possible; e.g. a $250 target might calculate a quantity of 3, producing a real risk of $257). |
| Stop Loss Points | Available when the Stop Loss strategy is set to Points. |
| Take Profit Currency | The take-profit amount in dollars, used when the Fixed Currency Value strategy is selected. |
| Take Profit Points | Available when the Take Profit strategy is set to Points. |
| Scale out % Qty at % Target | Closes a percentage of the position's quantity once price hits a percentage of the profit target (rounded down when fractional — e.g. 50% of a 5-lot position closes 2 contracts). |
| Scale out at % Target | The percentage of the profit target that triggers the scale-out mechanism. |
| Scale out % Qty | The percentage of the quantity closed by the scale-out mechanism. |
| DCA (Grid) Parameters | |
| Breakeven Profit Shift | Used with the DCA position management method — adds a bit of profit to the breakeven definition, useful to cover commission costs when closing the grid at breakeven. |
| Grid Size to Breakeven | Used with the DCA position management method — the number of order increases required before the position can be closed at breakeven. |
| Min Grid Gap (Point) | Used with the DCA position management method — the minimum gap, in points, required between two grid orders. |
| Bar Close Trigger | Used with the DCA position management method — grid orders open on bar close in the direction of the trade. |
| Trailing Stop Parameters | |
| Trailing Stop Strategy |
Used with the Classic Trail Stop position management method.
|
| Trailing Stop Trigger | Used with the Classic Trail Stop method — the trigger (in points or ratio). |
| Trail Amount | Used with the Classic Trail Stop method — the amount (in points or ratio) trailed once the trigger is hit. |
| Command Buttons | |
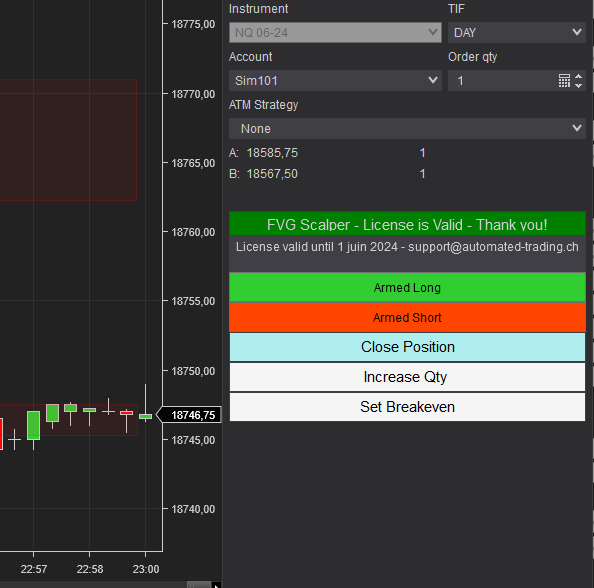
The strategy exposes manual command buttons on the Chart Trader panel — make sure it's displayed on your active chart.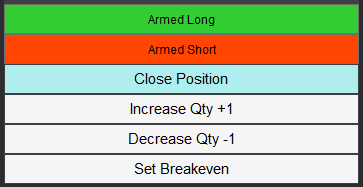 | |
| Arm/Disarm Buttons | Manually enable/disable entering long or short trades — useful if you have a directional bias or conviction. |
| Close Position Button | Immediately flattens the position on the active instrument without restarting the strategy, which keeps looking for new trades afterward. |
| Increase Qty Button | Increases the current active position's quantity by the amount set in Order Qty — useful to manually dollar-cost average, or to add to a winning position. |
| Set Breakeven Button | Moves the open position's stop loss to breakeven, if doing so would improve it. |
Performance Reports
Past results are not a guarantee of future results. All backtesting results are for indicative purposes only.
No performance reports have been uploaded for this strategy yet.
Download & Installation Instructions
License Requirements
At automated-trading.ch you can choose to either purchase a monthly subscription to use our premium products, or use our free products without subscribing.
In both cases, you need to create an account so you can get a License you can use for both premium and free products.
To obtain your license, simply sign up and then get your license on the billing page.
Download
You can also download this strategy — and every other automated-trading.ch strategy or indicator — anytime from your centralized Downloads page.
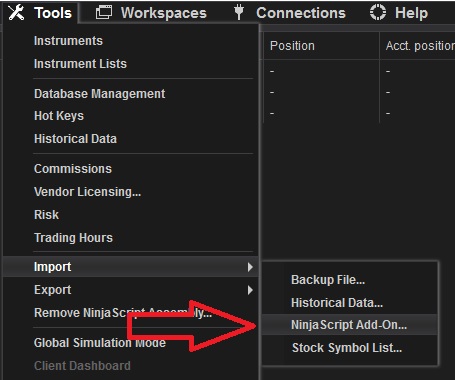
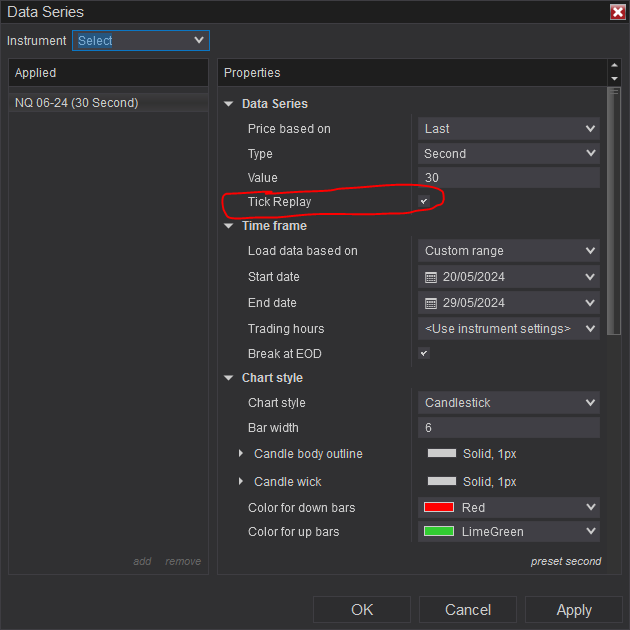
Installation Steps
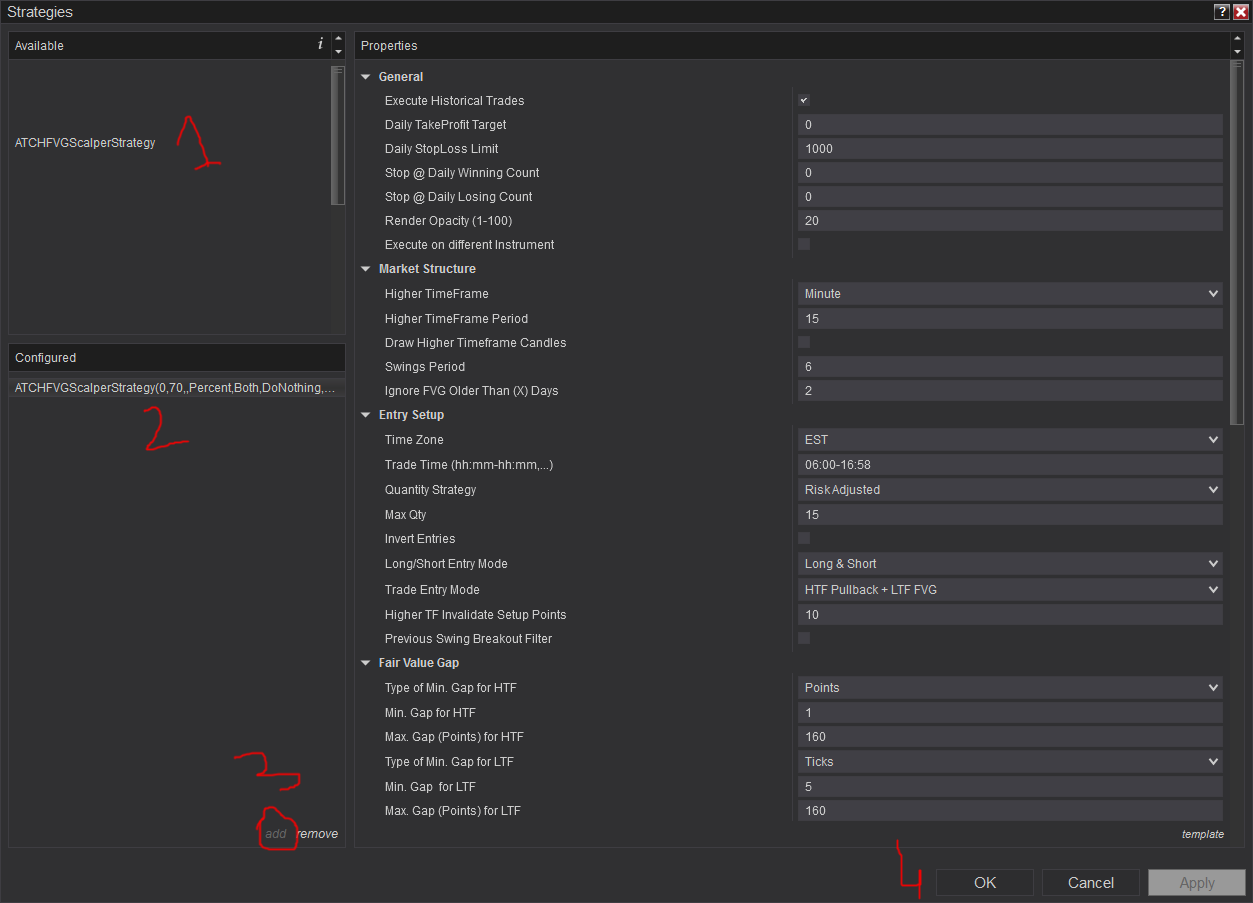
Frequently Asked Questions
General
Billing
Skeptics
Release Notes
- Bug Fix: Error when using ATM Strategy
- Fixed Entry bug making entry in only one direction; Various code optimizations; Added Decrease quantity button
- Complete makeover with new parameters added/removed
- Bug Fix on bearish FVG detection
- Added possibility to execute trades on micro instruments
- Fixed Take Profit value when in Points mode; Fixed very critical error on short FVG+FVG entries; Added FVG filter as new parameter
- Fixed installation issue
- First Release of the strategy